Saturday, February 8, 2014

DHT11 on ATtiny85

Recently I got my DHT11 temperature and humidity sensor working with my Arduino Mega2560. If you are interested in that, check it out HERE. However, while that was all well and good, I found it a bit impractical. While I may someday decide to create some sort of weather logger using the DHT11, it is unlikely that I would dedicate an entire Arduino to the task. Enter ATtiny85.

The ATtiny85 is great because it is cheap, but the real question is, "Does it work with the DHT11?" Yes it does.

Now in my last post I used the DHT library from Adafruit. While that library served its purpose, it does not work with the ATtiny. Don't ask me why; I did not explore it. HERE is another report of it not working and a description of what will happen if you try it. It reads out all zeros.

What does work is the DHT11 library. To get it working you will need to modify the example code. Basically, you need to change everything that says "Serial" to the Software Serial equivalent. This will allow us to get the sensor readings back from the ATtiny. If you want more information on serial communication on an ATtiny, check out THIS post. Alternatively, you could just download my code (HERE), wire everything the way I say, and see if it works.

Now when you go to compile my example, there is a good chance you will run into a problem. As it turns out,  there is an issue with the tiny core when trying to compile sketches close to the maximum sketch size. Luckily there is a quick and easy fix. I won't go into the details, but follow the instructions HERE.

When that was straightened out I was able to upload my sketch successfully. I used my USBtinyISP and my ATtiny85/45 programming adapter.


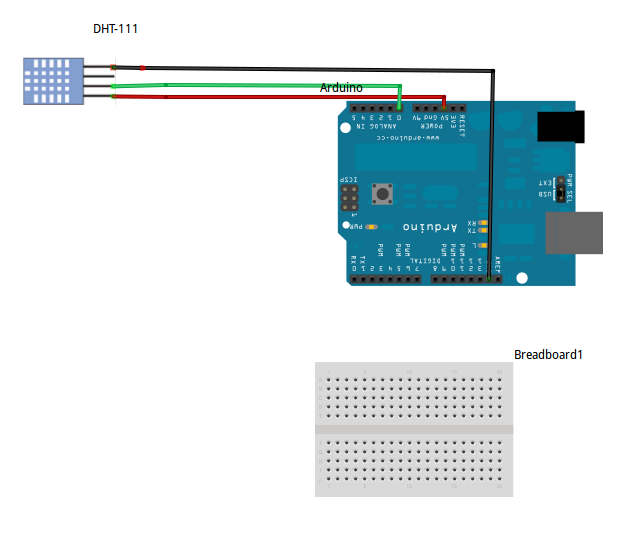
The only thing left to do is wire it up and see the output. Basic wiring of the DHT11 is the same as in my last post.

Correct Wiring:
Pin 1: +5V
Pin 2: Signal. Connect to digital IO with a 5k ohm pull-up resistor
Pin 3: Nothing. Some people suggest grounding it if you run into trouble
Pin 4: GND

On the ATtiny side, PB3 is the software serial Rx and PB4 is the software serial Tx. Connect those to an FTDI (or some other serial receiving device). Connect 5V and ground.


Power it up and watch the show!


This of course could be modified to do other things with the temperature data. It could, for instance, transmit them via I2C. Maybe it could log them on an SD card. Those projects I leave to you (for now anyway). If you are interested in more ATtiny projects of mine, check out my ATtiny label. Let me know if this works or doesn't work for you. As always, I'm happy to help.

-Matthew

Monday, February 3, 2014

DHT11 with Adafruit Library and Arduino Mega 2560

In this post I will be playing with the DHT11 Temperature and Humidity Sensor with my Arduino Mega 2560. While a DHT22 could also be used, I used a DHT11 mostly because it and it was cheap. I think I got mine for around a dollar. They can also be found it premade breakouts, but there really isn't much to them. As you can tell from the picture in the link, the breakout merely removes the extra pin and adds the pull-up resistor and a decoupling capacitor.

Once you decide on which sensor to buy, you will be faced with yet another choice. What library should I use? There are approximately a lot of them out there. I chose the Adafruit DHT library found HERE. It worked for me (and supports multiple sensors), so I saw little reason to pursue any of the other libraries.
This does NOT work

Now when I bought my DHT11 from Ebay, a picture like this was on the listing. Quite frankly, I don't understand what this is getting at. It doesn't work. While I can't vouch for the rest of the world, my sensor is not analog. It is digital. You can even look at the datasheet.

Correct Wiring:
Pin 1: +5V
Pin 2: Signal. Connect to digital IO with a 5k ohm pull-up resistor
Pin 3: Nothing. Some people suggest grounding it if you run into trouble
Pin 4: GND


Once everything is wired up, open the example sketch. It does about everything I would want it to do, so there is not much to say. Uncomment the correct sensor and upload. Open the serial monitor and get testing. 

There isn't much to say about this sensor. It is slow and probably not too accurate, but with the hard work of making the library already done, this sensor is incredibly easy to use. If you don't like my description of this sensor, there are many others out there at your disposal. If you do like it, I'm glad I could be of help.

-Matthew