I've recently gotten interested in machine learning and all of the tools that come along with that. This post will document a method of doing object recognition in ROS using Keras. I don't want to turn this post into a "what is machine learning and how does it work" piece, so I am going to assume you are familiar with machine learning in general and the robotic operating system (ROS). Instead I'm going to present a specific set of instructions on how to get a specific (but very useful) machine learning algorithm working on a ROS platform.
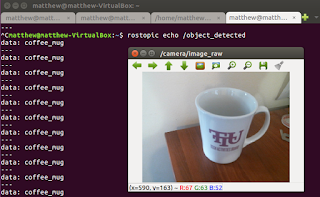 |
| The end result. Object recognition in ROS on a live webcam (~2Hz) |
When I was looking around the ROS wiki I was a bit surprised that there was no object recognition package readily available. I decided I wanted one; that is I wanted a package that would take a raw camera image and tell me what was in the picture. While I have no doubt that there are many obscure ways of doing this, the most common these days (to my knowledge) is machine learning - specifically using convolutional neural networks (CNNs). In fact, it is often used as an example of what machine learning is all about. This is where this project picks up.
There are many tutorials on getting CNNs working on various platforms, but I am going to use Keras with the TensorFlow backend. The idea is this, there are plenty of tutorials on getting object recognition working with this package. Pick one (I used
THIS one, but more general would be the
Keras documentation). This code is simply Python code. ROS accepts Python code via rospy. Let's put this code into a ROS package. I will be the first to admit that I am not an expert in ROS or machine learning, so use these instructions at your own risk. However, this did work for me.
Step 1: Install TensorFlow
I am installing TensorFlow on my virtualized Ubuntu 16.04 install as created in
this post. I will tell you that this works surprisingly well, but I am giving it 12 GB of RAM and 3 cores of an i7. The point is, if you have Windows this will work for you too!
Install TensorFlow using the
Linux install instructions. I used the CPU support only ones for virtualenv. This is probably not the best way to do this as I imagine there is a way in ROS to handle external dependencies. Feel free to comment below what that is. I figured worst case I could activate the virtualenv in my launch file. This will work for prototyping. When you decide which version of Python to use, I used 2.7 as this is the version recommended for ROS Kinetic. Be sure to
validate the install before proceeding.
Step 2: Install Keras
Next you want to
install Keras. The important note here is that you want to install this in the same virtualenv environment as TensorFlow. Do this by activating the environment before you install like you did in the TensorFlow directions (source ~/tensorflow/bin/activate). The TensorFlow backend is the default, so you are ok there. However you will need h5py. Install this with <pip install h5py>.
Step 3: Build your ROS package
First, we need to create a package. Call it what you want, but note the dependencies.
catkin_create_pkg object_recognition rospy std_msgs cv_bridge sensor_msgs
Next, create a new file called classify.py, and make sure it is an enabled as an executable. Copy the code below into the file.
#!/usr/bin/env python
import rospy
import cv2
import roslib
import numpy as np
from std_msgs.msg import String
from std_msgs.msg import Float32
from sensor_msgs.msg import Image
from cv_bridge import CvBridge, CvBridgeError

import tensorflow as tf
from keras.preprocessing import image
from keras.applications.resnet50 import ResNet50, preprocess_input, decode_predictions

# import model and  implement fix found here.
# https://github.com/fchollet/keras/issues/2397
model = ResNet50(weights='imagenet')
model._make_predict_function()
graph = tf.get_default_graph()
target_size = (224, 224)

rospy.init_node('classify', anonymous=True)
#These should be combined into a single message
pub = rospy.Publisher('object_detected', String, queue_size = 1)
pub1 = rospy.Publisher('object_detected_probability', Float32, queue_size = 1)
bridge = CvBridge()

msg_string = String()
msg_float = Float32()


def callback(image_msg):
    #First convert the image to OpenCV image
    cv_image = bridge.imgmsg_to_cv2(image_msg, desired_encoding="passthrough")
    cv_image = cv2.resize(cv_image, target_size)  # resize image
    np_image = np.asarray(cv_image)               # read as np array
    np_image = np.expand_dims(np_image, axis=0)   # Add another dimension for tensorflow
    np_image = np_image.astype(float)  # preprocess needs float64 and img is uint8
    np_image = preprocess_input(np_image)         # Regularize the data

    global graph                                  # This is a workaround for asynchronous execution
    with graph.as_default():
       preds = model.predict(np_image)            # Classify the image
       # decode returns a list  of tuples [(class,description,probability),(class, descrip ...
       pred_string = decode_predictions(preds, top=1)[0]   # Decode top 1 predictions
       msg_string.data = pred_string[0][1]
       msg_float.data = float(pred_string[0][2])
       pub.publish(msg_string)
       pub1.publish(msg_float)

rospy.Subscriber("camera/image_raw", Image, callback, queue_size = 1, buff_size = 16777216)


while not rospy.is_shutdown():
  rospy.spin()
At this point you can obviously go straight to running the code if you wish, but I'll step through each chunk and explain it.
Load Dependencies
#!/usr/bin/env python
import rospy
import cv2
import roslib
import numpy as np
from std_msgs.msg import String
from std_msgs.msg import Float32
from sensor_msgs.msg import Image
from cv_bridge import CvBridge, CvBridgeError

import tensorflow as tf
from keras.preprocessing import image
from keras.applications.resnet50 import ResNet50, preprocess_input, decode_predictions
This section just imports the dependencies. You can see we have some from Python, some from ROS, and some from Keras. If you are not too familiar with rospy, the comment on the first line always has to be there. Don't put anything else on the first line or else ROS won't know this is a Python script.
Load Keras Model
# import model and  implement fix found here.
# https://github.com/fchollet/keras/issues/2397
model = ResNet50(weights='imagenet')
model._make_predict_function()
graph = tf.get_default_graph()
target_size = (224, 224)
This section is where we import our machine learning model. I am using the ResNet50 model frankly because that is what the tutorial linked above used, but there are many others included if you look
HERE. You can see that this ResNet model was trained using ImageNet, but you could also obviously insert your own model or weights here as well. Also note
the fix that his been implemented as noted in the comment.
Start ROS Node
rospy.init_node('classify', anonymous=True)
#These should be combined into a single message
pub = rospy.Publisher('object_detected', String, queue_size = 1)
pub1 = rospy.Publisher('object_detected_probability', Float32, queue_size = 1)
bridge = CvBridge()

msg_string = String()
msg_float = Float32()
This starts all of the ROS stuff. We initialize the node and start two publishers. Now, I am aware that this is bad practice. I should really create a ROS message to house this data. However, at the moment I don't have a specific application for this, so I will leave that to the user. I am just publishing two different messages - one for the name of the most likely object name and one for the corresponding probability.
Run Model Inside callback
def callback(image_msg):
    #First convert the image to OpenCV image
    cv_image = bridge.imgmsg_to_cv2(image_msg, desired_encoding="passthrough")
    cv_image = cv2.resize(cv_image, target_size)  # resize image
    np_image = np.asarray(cv_image)               # read as np array
    np_image = np.expand_dims(np_image, axis=0)   # Add another dimension for tensorflow
    np_image = np_image.astype(float)  # preprocess needs float64 and img is uint8
    np_image = preprocess_input(np_image)         # Normalize the data

    global graph                                  # This is a workaround for asynchronous execution
    with graph.as_default():
       preds = model.predict(np_image)            # Classify the image
       # decode returns a list  of tuples [(class,description,probability),(class, descrip ...
       pred_string = decode_predictions(preds, top=1)[0]   # Decode top 1 predictions
       msg_string.data = pred_string[0][1]
       msg_float.data = float(pred_string[0][2])
       pub.publish(msg_string)
       pub1.publish(msg_float)

rospy.Subscriber("camera/image_raw", Image, callback, queue_size = 1, buff_size = 16777216)

while not rospy.is_shutdown():
  rospy.spin()
Here is the heart of the code. I tried to comment it pretty well, but here is the workflow.
- The callback function fires when a new image is available.
- Use cv_bridge to convert the image from a ROS image type to an OpenCV image type.
- Resize the image to the shape required by ResNet50, 224 x 224.
- Read the OpenCV image in as a NumPy array.
- Expand the array into the size needed for TensorFlow.
- Convert the data from uint8 to float64.
- Normalize the data.
- Run the model and classify the image.
- Decode the prediction and convert them to appropriate data types.
- Publish the prediction.
It's also worth noting the large buffer size on the subscriber. This was done per the recommendation
HERE.
Step 4: Run the Code!
Now the fun part. Start your webcam via your favorite method. We just need the camera/image_raw topic which is pretty standard. If you need help with that, see
my other post on AR Tags for instructions.
Now we need to launch our node. It's important that we do that in our virtualenv, so source the environment again if you haven't already (source ~/tensorflow/bin/activate). Then just rosrun your node.
rosrun object_recognition classify.py
Now you should be able to rostopic echo /object_detected and /object_detected_probability to see what your webcam is seeing. On my virtual machine this runs at about 2 Hz, but I imagine that could be increased if you're on a typical Ubuntu install. Here are some examples! It does ok. It didn't recognize a pack of playing cards, so I am guessing that is not in the ImageNet training set. I am still fairly impressed with it.
So that's it; you can now implement an object recognition package in ROS! Comment below if you use this in a project. I'd be particularly interested if someone uses their own model or does some transfer learning with this one to suit their specific application. If you have any other questions or comments, feel free to post those as well.
-Matthew


