Wiring
 |
| "Completed" Wiring |
As the wiki page already has a very complete set of instructions on wiring, I will refrain from giving a step-by-step description of the procedure. I will instead clarify a few points that caused me a bit of confusion or could cause confusion.
1) The Arduino does indeed mount in the holes shown on the wiki page. The USB port points down. I initially could not manage to get the holes lined up, but they eventually cooperated.
2) The endstops as wired in the picture are connected to the min endstop pin. That doesn't really matter right now, but you will need to know that when you go to setup the firmware.
3) On the power supply L=Line, N=Neutral, and G= Ground. I used a multimeter to find out which wire goes to which pin. If you live in Tennessee you should have about 120 VAC across the line and neutral. Be sure you change the switch on the power supply to 110V mode.
4) When wiring the motors you can plug both Z motors into the ramps board. There are (quite conveniently) two headers there. You don't have to have an external combining pcb as shown in the picture on the wiki.
5) I used the fan that came with the Replikeo kit as an extruder cooling fan, not a "Print Fan". As such, I did not connect it to D9. This required that I crimp on an old servo connector I had to attach it to the extruder fan pins. These are just a 12V breakout. Whenever you plug your printer in, it is going to come on.
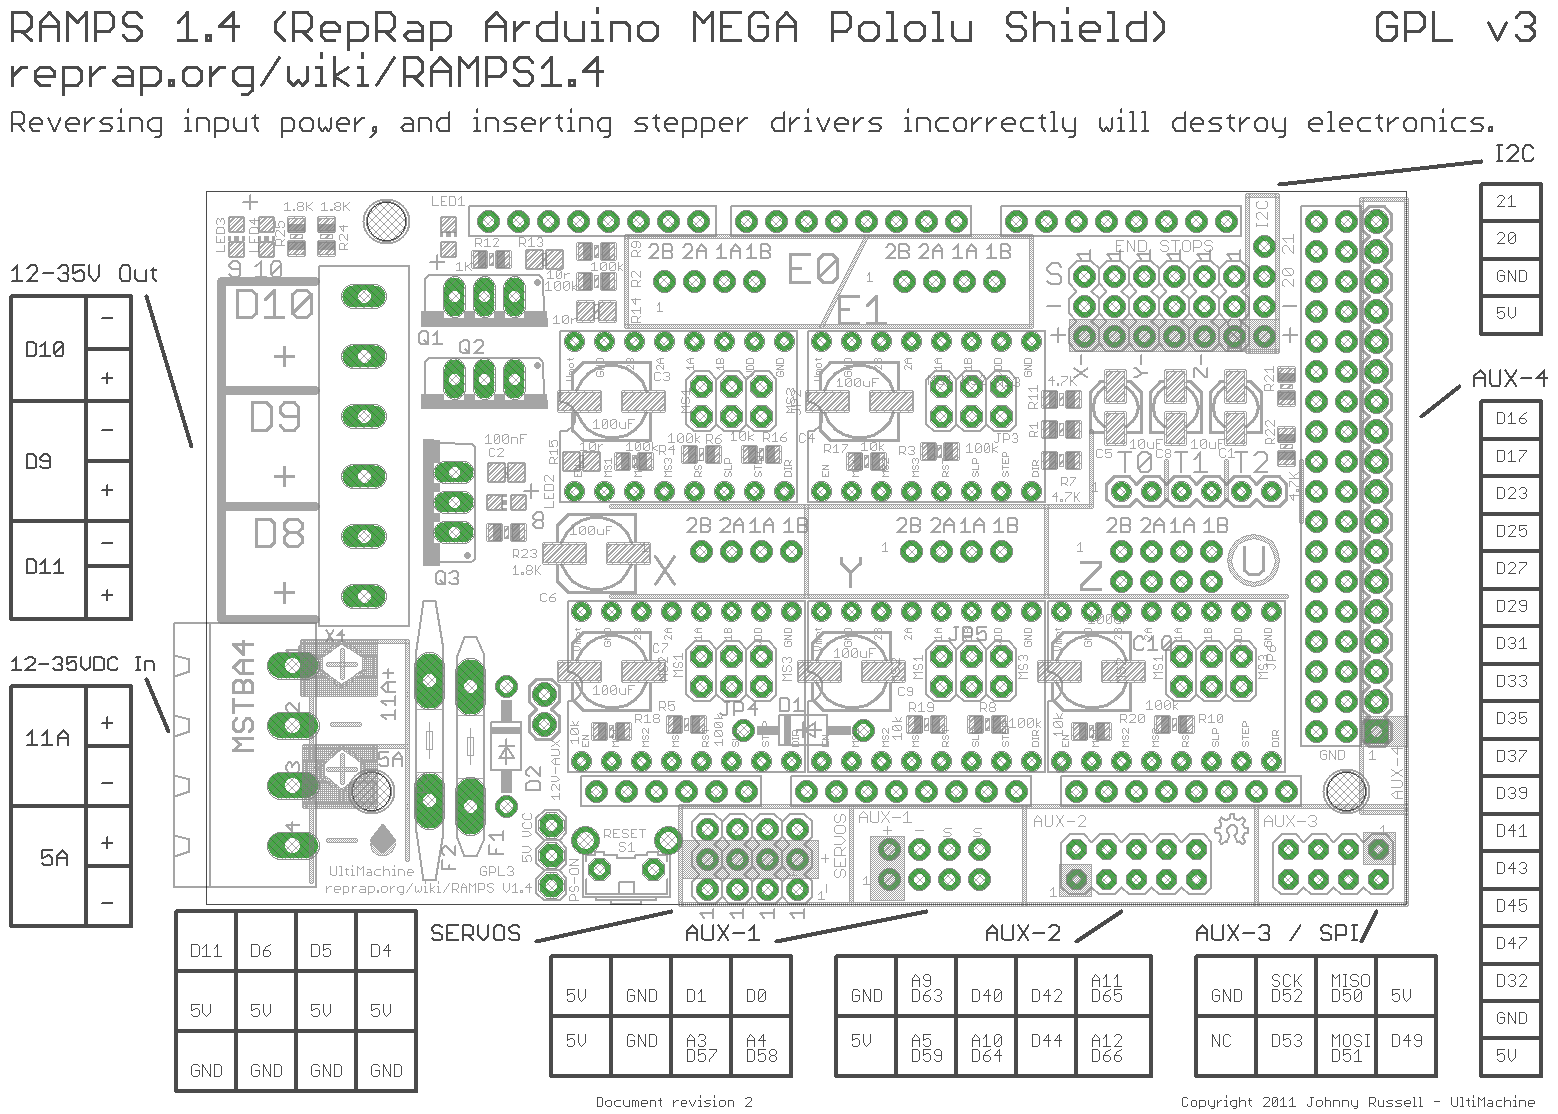 |
| Ramps 1.4 Pinout |
Software
I am using the Repetier Firmware with Repetier Host and Slic3r. Repetier has a very convenient web setup tool. It really wasn't all that difficult and was pretty helpful in figuring out how things worked, but if you are having problems and want to try the firmware I am using download mine HERE. Just upload the configuration.h file and see what's going on. One thing to remember, some of the settings may be getting set in EEPROM. This means you will need to update them from Repetier Host. It's under the Config tab.
In Repetier Host, be sure to input all the correct Printer Settings. For instance I have a max x endstop and the other two are mins. And my bed is actually 190x170. If you follow the installation instructions on Repetier's website you should be fine.
In Slic3r for the ABS that was included with the kit a lot of the default settings work fairly well. For the filament settings my diameter measured to be about 1.73mm and I print at 230 for the first layer and 215 for the rest. Bed is at 100. I also had some success starting the bed at 100 then dropping it to 85. I have not been able to calibrate the thermistor yet, so I can't be verify that those are the actual temperatures. But those settings work for me.
Now the fun part begins, You get to go play and test things. I doubt very many people will read this and use it as a guide to assembling their printers. However, if you are trying to decide if this is the printer for you, I can confirm that the wiring and software is equally simple. A few hours and I had it working.
That's all for part 3. In part 4 I will show some pictures of my "completed" printer and the modifications I made. Some of them are good. Some of them still require work.
-Matthew