Thursday, April 4, 2013

ATtiny85 programming adapter

I've been playing with the my ATtiny85 and have been enjoying it. However, programming it can be a pain, because I have to break out the jumper wires and the datasheet to figure out which wires go where. This got annoying quick, so I got to problem solving.

This was the result. It simply plugs into my breadboard on top of the ATtiny and then rearranges the pins into a convenient 6-pin connector for my USBtinyISP. It works pretty well. I wanted to make a full Arduino style breakout board for it but had two things inhibiting that.

This stuff is junk.
One, my female headers haven't come in yet. They are in the mail, so maybe I will do that someday. Two, the cheap perfboard that I bought is cheap. It only has contacts on one side. I struggled working with it for a while. When I pulled a pad off of one contact, I gave up and got the good stuff. I switched to the stuff from HobbyKing. Now on to making your own
.

What you'll need

  • Male headers- specifically you'll need 14 pins
  • Protoboard- I used THIS stuff and it worked great. Perfect size too.
  • Wire- I used some stuff I had around. I believe it is called Kynar.
Step One: Cut the board to length. I needed a grid that was 6 x 7. However, when I switched to the HK protoboard, it was close to the size, so I used that.

Step Two: Solder on the male headers that plug into the ATtiny. It is simplest to plug it into a breadboard while you do this so that you know it will be straight and fit in the sockets.


Step Three: Solder on the male headers that plug into the USBtinyISP. I did the same thing as above and just flipped it over and soldered it in the breadboard.


Step Four: Connect the dots. This takes a little ingenuity on your part. I put the side with the RESET and GND pins on the left so that most of the pins were fairly straghtfoward. Be sure to mark it so you know which way to plug in the cable. The important thing is that   they a) go to the right places b) don't go to the wrong places and c) don't go where the ATtiny will physically be when this thing sits on top of it.


Step Five: Ring it out. Now you go through EVERY pin on the thing and make sure it goes where its supposed to (see the above charts). Next you go through EVERY pin and make sure it doesn't short out anywhere or do anything else harmful. I will not be responsible for any fried chips but my own.


Not pressed down
Now go test it out. I found it quite a bit more convenient than breaking out the charts and jumper wires every time. It's also less prone to errors. I will mention that you may need to unplug other things when loading code. Example, I had a servo plugged into pin 1 and tried to load code. The servo jumped around and the code didn't load right. Also, it probably would not be good to hook it up when the chip is under power. I don't know that for a fact but call it intuition.

Here are some more pictures in case its fuzzy just how this thing is connecting to the ATtiny. It sits on top of it.
It place and ready to go.


Well that's all I have.  I hope you find this useful. Have fun in all your endeavors

 -Matthew

Wednesday, April 3, 2013

Recent Purchases: Mini-reviews

Well I thought I should mention some of my recent purchases that made the below project possible. I'll try to make this brief. If you haven't seen that project, go back two posts.


ATtiny85: I got this off of eBay for a few dollars. In the future, I will probably buy them somewhere else, but I just wanted one, so that was the cheapest thing to do. I am pleased with it.

Solderless Breadboard: 830 point solderless breadboard. MB-102. Also from Ebay. $4 shipped. I like it. It is twice as big as my other ones and the roominess is nice.

MB-102 Power Supply Module: Thats the thing on the left. It works really well. I am quite pleased. It takes a center positive power supply or a male usb A. It is switched and can provide 3.3V or 5V. It plugs right into the power rails of the board. $2.15 shipped from Ebay.

Jumper Wires: Yes I sold out and bought some ready made jumpers. I'm glad I did. They are stranded and thus much easier to work with. I was getting all my plain white wires confused. The colors make it easier. Note that I did not get an even distribution of colors. I got 65 total and maybe 3 were black. $2.39 from Ebay. I've only found one so far that doesn't work.

10K pot: I got these from Ebay a long time ago. I don't remember how much they were, but it was a few dollars for 10. They work ok. They were 10 +1-2 K. But for my purposes they were ok. A slight annoyance, the pins aren't long enough to go into a breadboard. Had to solder on some...

Male Headers: I got ten 40 pin rows of them for $.99 (Ebay-China)

HXT-900 Servo: These are my favorite servos, hands down. Cheap. Simple. Reliable. They are sold under various names much as sg-900 and towerpro. They are the 9g servo from HexTronik Ltd, the company that manufactures everything for Hobbyking. Get these servos HERE. And if you manage to strip the gears, get the replacement HERE. Its also worth noting that they sell a 5g version HERE. I did a write-up about HobbyKing in one of my first posts. I also got my first Arduino there.

Other: I also got 10 paper prototype boards from Ebay for $1.38. They had a bit of a chemical odor and were not the best, but they will do for messing around. Hobbyking also sells some higher quality stuff that I have bought. The green stuff. Its HERE. That stuff is pretty nice.

I have got some female headers as well for various projects that I have in my mind. They seem pretty decent. I got 10pcs 1x40 breakaway female headers for $3 from Ebay.

USBtinyISP: I put this last because I really have already mentioned this quite a bit, but I love this thing. It is extremely easy to use. You might look into the tinyProgrammer instead if you just want to do ATtinys, but this was $15 on Ebay from a US seller. It is high quality and I love it. Check out some of my past posts tagged USBtinyISP.

That's all I have for now. Go forth and spend you're hard-earned money.
-Matthew

Monday, April 1, 2013

SoftwareServo library - ATtiny85/45/25

This post will cover the the examples of ATtiny that come with the modified SoftwareServo library found HERE Please note that the commands themselves have not been changed. I merely changed it for IDE 1.0+ compatibility and added a few examples. For information, check it out HERE.

What you will need:

  • ATtiny85/45/25
  • USBtinyISP or other method of programming
  • Hobby servo
  • Jumper wires
  • Breadboard
  • 10K potentiometer 
First, I am assuming that you know how to load programs onto the ATtiny. If not, please refer to my last few posts and THIS link.

Second, I'm going to assume you have either tried the Servo library that comes with the IDE and know it does not work or have read my previous post.

Third, don't expect the SerialServo example to work on the ATtiny.

Configure the ATtiny: We need it to run at 8MHz. Luckily it has an internal 8MHz clock. We merely need to plug it in, select ATtiny85 (internal 8 MHz) under boards and hit burn bootloader. It should load pretty quickly.

In case you don't want to read the datasheet. (credits)
Sweep: This is the first example I added. It is very similar to the sweep example from the Servo library. Notice that you have to refresh the servo manually. This could be useful or annoying depending on your situation. Regardless, it is the nature of the beast.

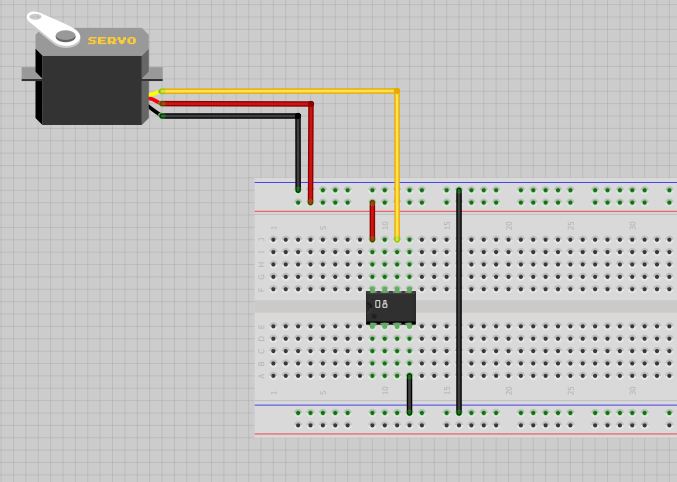
Here is a diagram of how you should wire everything up. It is pretty simple. As you can see from the pinout chart above, you could change the pins somewhat. 


Knob: This too is similar to the example found in the Servo library. This requires that you hook up a 10k pot to pin 3. As you can see, you can choose one of the other analog inputs instead if you wish. 

Again, here is a diagram of how you can wire everything up.


Now in case you are one of those people that just like to see the real thing, you can check out a video of sweep HERE and knob HERE.

If you have any questions or comments, either comment here or send me an email.
-Matthew