Having previously encountered multiplexing, I turned to that. There I found my solution. Charlieplexing. According to Wikipedia, Charlieplexing uses the tri-state logic capabilities of microcontrollers to control gobs of LEDs with a few pins. The details of Charlieplexing are a bit confusing. I don't feel fully qualified to explain them, so here are the important things to know.
1) An Arduino pin can be in 3 modes: OUTPUT: HIGH, OUTPUT: LOW, or INPUT. When a pin is set as an input, it is put in a high-impedance state. Outputs are in a low-impedance state. If you have no idea what I'm talking about, see THIS link.
 2) LEDs (Light Emitting Diodes) only work in one direction. If you did not know this you may have at some
point wondered why your LED was not working. Don't worry. Ignorance isn't a crime...that I know of.
3) Your Arduino (even your ATtiny) can turn LEDs on and off many more times a second than your eye can see. Think how a video shot at 30 frames per second (NTSC TV) looks. That's 30 Hz. A "normal" Arduino runs at 16 MHz (16000000 Hz). Now granted you can't turn an LED on and off that fast, but you get my point. I will be running the ATtiny at 8MHz. This is the fastest you can run it without external hardware.
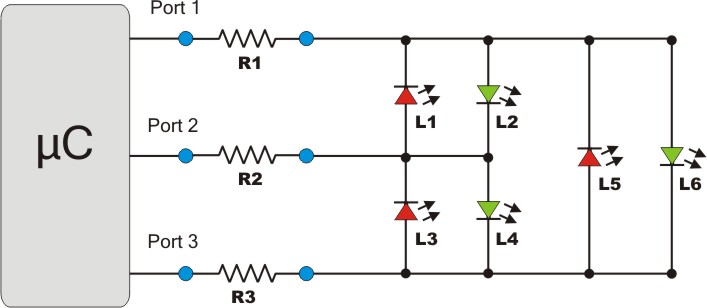
All this combined means that I can control 6 LEDs with only 3 pins. Great! Next I searched for a library to take care of all the heavy lifting. Introducing the Charlieplex Library. This library takes care of all the tedious stuff to let us worry about what we want the LEDs to do at the Macro level.
I'm not going to go into the details of how to use the library because the Arduino playground page does a pretty good job. However, for those that are interested HERE is my code. It is a basic modification of the SimpleCharlie example to control 6 LEDs.
To the right is a schematic for how to wire up the LEDs. There are also resources available on Google to help you do that. HERE is one resource on how to draw your own schematic. Video would be rather anticlimactic, and I have already disassembled it. The schematic will have to do.
Hope this works for you.
-Matthew
No comments:
Post a Comment