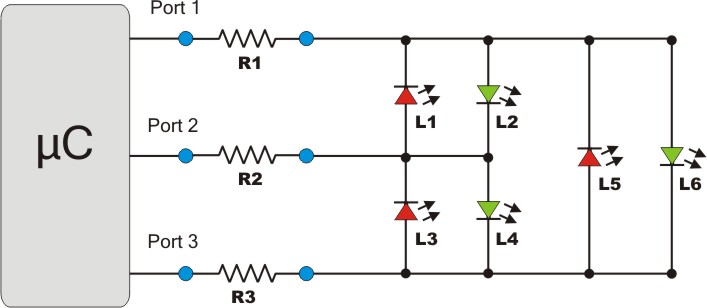
Hardware involved:
- 1: ATtiny45
- 1: HXT900 Servo (modified)
- 1: Momentary Switch
- 1: 10k Potentiometer
- 1: 5V Voltage Regulator
- 1: DC Power Jack
- 1: 2 Way Switch
- 1: 3 Battery AA Holder
- 6: 5mm Colored LEDs
- 3: 270 Ohm resistors
- Wire

Software Involved
First, the ATtiny core. I have done several posts involving ATtinys in the past. Follow the instructions from the link above to use an ATtiny with the Arduino IDE.
Second, the SoftwareServo Library on the ATtiny. I have already done a post on controlling servos with an ATtiny. Find it HERE. Basically, the regular Servo library will not work because it doesn't have the necessary timer, so SoftwareServo must be used.
Next we have the Charlieplex Library. It takes care of setting the pins correctly to turn on the LEDs we will be using. I have done a post on this library as well. Find it HERE.
Last we come to my sketch. You can get it HERE. It may be a bit convoluted , so I tried to comment it to be understandable. The essence is this, there are 10 different LED modes that the user switches between by pushing a button. At the same time the servo which has been modified for continuous rotation as discussed HERE is controlled by turning a 10k pot.
I made a nice wooden base for the electronics and mounted the servo on 2 wooden uprights. The sign itself is made of dowel rods and home insulation foam cut into circles. I made it such that an 8.5 x 11 sheet of paper will fit on it when rolled horizontally.


I soldered together all the electronics. I put a 270 Ohm resistor on each LED pin. I also put a 10 uF electrolytic capacitor across the power leads and a diode protecting against unwary users plugging in power backwards, but those probably aren't necessary.
I did run into one problem in the course of this process. The servo would stop working when I set a certain LED pin LOW. I never did get to the bottom of it, but it is discussed in THIS forum thread. I ended up changing the pins I was using, and it solved the problem. I included a diagram of my pinout in the code posted above.
That's about all the details I am going to give you. The whole project took quite a while, and it's a DIY project. I'm not selling kits. If you want, you can view my project photos HERE, and I took a nice video for you to look at. I hope I inspired you to greatness.
-Matthew
Second, the SoftwareServo Library on the ATtiny. I have already done a post on controlling servos with an ATtiny. Find it HERE. Basically, the regular Servo library will not work because it doesn't have the necessary timer, so SoftwareServo must be used.
Next we have the Charlieplex Library. It takes care of setting the pins correctly to turn on the LEDs we will be using. I have done a post on this library as well. Find it HERE.
Last we come to my sketch. You can get it HERE. It may be a bit convoluted , so I tried to comment it to be understandable. The essence is this, there are 10 different LED modes that the user switches between by pushing a button. At the same time the servo which has been modified for continuous rotation as discussed HERE is controlled by turning a 10k pot.
I made a nice wooden base for the electronics and mounted the servo on 2 wooden uprights. The sign itself is made of dowel rods and home insulation foam cut into circles. I made it such that an 8.5 x 11 sheet of paper will fit on it when rolled horizontally.
I did run into one problem in the course of this process. The servo would stop working when I set a certain LED pin LOW. I never did get to the bottom of it, but it is discussed in THIS forum thread. I ended up changing the pins I was using, and it solved the problem. I included a diagram of my pinout in the code posted above.
That's about all the details I am going to give you. The whole project took quite a while, and it's a DIY project. I'm not selling kits. If you want, you can view my project photos HERE, and I took a nice video for you to look at. I hope I inspired you to greatness.
-Matthew