Showing posts with label General Computer. Show all posts

Tuesday, November 7, 2017

Installing TensorFlow 1.4 on Windows 10 with Anaconda

I had a few problems during my install, so this will serve to document the procedure I used to get it to work correctly. The general install instructions are on tensorflow.org. These instructions may work on other versions of Windows, but they have not been tested. In this case I am installing the GPU enabled version, and I am assuming you have already verified that your graphics card is supported.

1) Install CUDA Toolkit 8.0

Do not install CUDA 9.0 unless you know what you are doing. 9.0 will be supported in TensorFlow 1.5 according to THIS post. For now you will have to download 8.0 from the CUDA archive. It kept bugging me to install Visual Studio, and I finally did. I don't think that is actually a requirement though if you plan to use something else.

2) Install cuDNN 6.0

I could not find an install for version 6.1, but this seemed to work just fine. You can find the different versions HERE. Just unzip them somewhere convenient and add the cuda/bin directory to the system %PATH% environment variable.

3) Create/Activate Anaconda Environment

If you have not already installed Anaconda, install it with Python version 3.6 (the instructions say 3.5, but I used an environment I already had set up with 3.6). Create the conda environment by opening the Anaconda prompt and typing:


conda create --name myEnvName python=3.6

Activate the environment by then typing:

activate myEnvName

4) Install TensorFlow Using pip

This step is where you need to pay attention. Do not follow the instructions on the TensorFlow website. When I did what they say I got the error described in THIS post. My conda environment would no longer activate. There was probably an easy fix, but I ended up having to reinstall Anaconda. If you find another solution, let me know in the comments. Instead, use this command (in your virtual environment):

pip install tensorflow-gpu 

While it looks like there is a conda-forge package you could install. The latest version of it at the time of this writing is 1.3.0. Granted TensorFlow 1.4 is only 5 days old, so they may release version 1.4 tomorrow on conda. If so, that would be an attractive option.

5) Validate your Install

You can now validate your install using the short program specified on the TensorFlow website.


python 

import tensorflow as tf
hello = tf.constant('Hello, TensorFlow!')
sess = tf.Session()
print(sess.run(hello))


This is how I got my install to work. If you have any errors, feel free to post them below, but you're better off Googling them or posting on StackOverflow.

Matthew

Saturday, November 4, 2017

Querying SQLite database using sqlite3 in JavaScript

Motivation

I've never regretted studying mechanical engineering instead of electrical engineering or computer science, but sometimes by lack of formal programming knowledge does bite me. This happened a few days ago when I wanted to see if I could apply some machine learning techniques to some data in a SQLite database. Having no experience with SQL and minimal experience with javascript, I Googled how to get the data. The answers that I found seemed overly complicated. As such, this post will be a practical example of  querying the data from an SQLite database. It is as much for my memory as anything. I was using JavaScript (via Node) and sqlite3. I did this on a Virtual Machine running Ubuntu, but I believe all of the tools I use can be used in Windows as well.

Data Visualization using SQLiteStudio

Here is a visualization of the data. It is some historical trade data from the cryptocurrency exchange,  Poloniex. Having never used SQL before, I downloaded SQLiteStudio to see what the data actually looked like. As you can see, the database contains two tables - in this case one for each of the two trading pairs for which I had data. Inside those tables, there are labeled columns. Each row has a unique id. 


Querying the Database using sqlite3

I found a tutorial (THIS ONE) and tried to follow it, but I found that it took a frustratingly long amount of time to figure out what all of the values meant. Anyway, here is my javascript code to query a single line from the database. If you understand this, the above tutorial should be easy to adapt to pulling multiple lines. Of course, you need to already have sqlite3 installed. 


//Import sqlite to read database
const sqlite3 = require('sqlite3').verbose();
//Connect to database
let db = new sqlite3.Database('./history/poloniex_0.1.db', (err) => {
  if (err) {
    console.error(err.message);
  }
  console.log('Connected to the database.');
});


// get columns start and label it as startval, open-> openval, etc from the appropriate table
// when the id = what we define it as below
let sql = `SELECT start startval,
                  open openval,
                  high highval
           FROM candles_USDT_ETH
           WHERE id = ?`;

let id = 2;
 
// Get only [id] row (in this case 2nd row)
db.get(sql, [id], (err, row) => {
  if (err) {
    return console.error(err.message);
  }
  return row
    ? console.log(row.startval, row.openval, row.highval)
    : console.log(`No values found with the id ${id}`);
 
});


// Close the database
db.close((err) => {
  if (err) {
    console.error(err.message);
  }
  console.log('Close the database connection.');
});


Converting the Table to CSV

Another useful thing I stumbled upon was how to convert a database from SQL to CSV in order to import it into some other program (in my case MATLAB). For my MATLAB example, I did not have the database toolbox, so this allowed me to play with this data without it. I copied THIS tutorial. It is more thorough, but here is the highlight. To save the start, open, and high columns from the candles_USDT_ETH table, use the following code.


sqlite3 ./history/poloniex_0.1.db
.headers on
.mode csv
.output data.csv
SELECT start,
       open, 
       high
FROM candles_USDT_ETH;
.quit


That's all I have for now. As I mentioned above, like many of my posts this is as much for my memory as anything, but I hope it helps someone.
-Matthew


Saturday, November 19, 2016

Raspian ROS on Raspberry PI B+ with Downloadable Image

I wanted to share my image of ROS Indigo for a Raspberry Pi B+. When I tried a couple of images I found online, none of them seemed to work, so I had to make my own. I will warn you that it is pretty slow, but ROS is installed. I was originally going to use this onboard a turtlebot, but I decided against it after seeing how slow it was. As far as I know it would work, but the extent of my testing was launching roscore. Here is the process I went through to create the image.

  1. Install Raspian Jessie with Pixel version September 2016
  2. Follow instructions on the ROS wiki for the ROS-Comm version on Indigo
  3. Pull Image using Win32DiskImager

Download the image here: Raspian_PiBPlus_ROS_Indigo_11_17_2016.7z


Notes:

  • It would probably be better to use the minimal version of Raspian. Like I commented above, it is pretty slow
  • I had issues building the catkin workspace. I think it was RAM related as the wiki suggests. I ended up closing everything that was open and running with the default -j4 option, and it worked.
  • Contrary to seemingly popular belief, ROS can be installed on an original Raspberry Pi. It is just painful. My install took several hours.
  • The image is 2.287 Gb compressed and 31.260 Gb uncompressed. 
I hope this is useful to someone.
-Matthew

Wednesday, September 28, 2016

Combining and Trimming Videos Without Re-encoding Using FMPEG


Recently I was tasked with trimming and combining some videos for work. We had filmed 16 hours of lectures and needed to make them ready to be published. Unfortunately the cameras we used split the video into 19 minute segments that then had to be recombined into one long video. I got to work.

It was recommended to me that I just use Windows Movie Maker. I was skeptical, but I decided to give it a try. I copied the first 3 videos into the Windows Movie Maker workspace and waited. After waiting several minutes for the files to import and seeing the progress bar barely move, I decided there had to be a better way. I had used FFMPEG in the past in the form of SUPER media encoder. However, this time I decided to go directly to the source and use FFMPEG from the command line. Since Windows 7 (64 bit) is my primary operating system, I would use that. Likewise, my videos are mp4 files, so these instructions are written for those.

Disclaimer: I am not an FFMPEG expert. This is just what I found that worked for me. No guarantees that it is the most efficient way or that it will even work for you.

1) Download FFMPEG - https://www.ffmpeg.org/download.html

FFMEG can be found at the link above. Select your operating system and put it in a convenient folder (I used a Windows static version). Unzip it, and it is ready to use.

2) Separate Files into Directories

The first thing you are going to want to do is separate each set of files that you want to join into directories (ie. folders). One thing to make your life easier, make the name short and leave out any spaces. For example, "JohnsBirthday" instead of "Johns Birthday May 22 1934"

3) Run Batch File and Navigate to Directory

Run the batch file in the folder where you unzipped FFMPEG. It should be called "ff-prompt.bat". This will launch FFMPEG in a command prompt in the directory where it is located. 

Now you need to navigate in the command prompt to the directory (the folder) where you put the videos. If you know how to do this, use your favorite method. If you don't, here are some basic instructions. "cd" is the command to change directory. The usage is below.
  • Use "cd .." to go up one level
  • Use "cd folderName" to navigate to a folder in your current directory
If you get lost, you could always put the videos you are working on in the folder with the batch file. Then you would not have to navigate anywhere.

4) Combine Videos Using FFMPEG


To combine a video we are going to "concatenate" them. If you are familiar with programming, it is the same concept as concatenating a string. You are taking one and sticking on the end of the other. HERE is the link to the ffmpeg wiki page with the documentation, but I will copy the steps below that I used.

1) Copy the command below into the command line you have open. Replace "mp4" with the file type of your videos (.wav, .mov, etc.). Then run the command. It should execute very quickly.
(for %i in (*.mp4) do @echo file '%i') > mylist.txt
This creates a list of the files to be concatenated. Alternatively, you can create the file by hand. One note on this, I am not sure how it determines the order. It seems to be by the name. Also, spaces in the name cause problems, so make sure no file names have spaces. 

2) Now copy this into the command line you have open. Note that the ".mp4" was added by me to get it to work. The wiki implies you shouldn't need it.
ffmpeg -f concat -i mylist.txt -c copy output.mp4
This will take some time to execute, but it will still be much faster than re-encoding the video. I was combining about 1.5Gb of video and it took 3 minutes.

Command Line at the End of Successful Execution

3) Verify video. I went through and double checked at the points were it transitioned to make sure everything worked out. This step is obviously optional

5) Trim Videos Using FFMPEG

Trimming is a bit more complicated. "Why does my audio get desynced when trimming with FMPEG?" This is because of something called "key frames" that mp4 files use. I did not take the time to research those all that much, but the long and short seems to be that you have to trim at a key frame if you want to be able to trim a video without re-encoding or desyncing the audio. This is the command line instruction.
ffmpeg -ss 00:03:35 -i output.mp4 -t 00:57:04 -c copy outputtrimmed.mp4
As best I understand it, here is what is happening - the -ss "searches" for the closest key frame to the time 00:03:35. This will happen at the speed of re-encoding (slow). It will then pull in the file "output.mp4" starting at that key frame and will copy from that frame until time 00:57:04 into the file "outputtrimmed.mp4". This part will happen without re-encoding and will be fairly fast. This does not allow to trim at exact points, but it allows you to do it quickly and without losing audio sync (both important in my book).

6) Repeat

Do this for all of your videos.

Conclusion

So that is how I combined and trimmed a bunch of 19 minute segments into hour long blocks totaling about 16 hours quickly and without re-encoding the video. No guarantees it will work for you. I just had a hard time finding detailed instructions on this, so I thought I would post. One note, I imagine trimming before you combine would speed up the process a bit. For me it just made sense to do it after so I would not have to juggle so many files. The process isn't that long anyway.

That's it! If you have any questions or comments post those in the comments below. If you have any other methods to try or ways to make this better, post those too!

Until later,
-Matthew


Friday, December 25, 2015

Fixing Login on Xiaomi Mi Band 2

This will be a fairly short post. I just wanted to get this out there in case others are working on this over Christmas. I may update this later as things progress. This all occurred yesterday 12/24/2015.

My mother received a mi band 2 for Christmas this year, and I was tasked with setting it up. I downloaded the latest version of mifit (version 1.8.111) and followed the setup procedure. I created an account using an email address and logged into google when prompted.

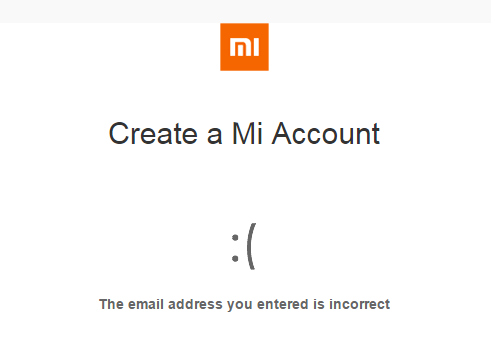
I tried multiple times, but it always gave an error - either "error 96103" or "invalid email address".


What worked for me...

1) Uninstall the most recent app.
2) Download an older version of the app. I used version 1.3.412 found HERE, but I cannot vouch for its safety apart from not receiving any obvious damage.
3) Transfer this file to the phone (or download it on the phone) and click on it. I used ES Filer Explorer for this.
4) Run this file. On ES File Explorer just navigate to the file, tap it, and select install. Here you may be required to turn off a security setting or two. Do this at your own risk. I would recommend turning it back on when you're done.
5) Follow the setup procedure and create an account. You will be required to put in a phone number and an email address.
6) Uninstall the old version.
7) Reinstall the current version and log in with the account you created.
8) Enjoy your mi band and comment on this page how the process went.

What I suspect will also work...

Just create an account using a phone number. The older version of the app requires a phone number to create the account. This leads me to believe just using the most recent app and selecting "create account with phone number" (or something like that) might also work.

If this works please comment on this post, so others will know. If you know of any other fixes please mention them there as well.

What didn't work - but could be tried again...

I tried using this link on a laptop. This did not work. It gave me the page below.


I hope this helps. Merry Christmas!
-Matthew 

Saturday, May 3, 2014

Delaying Startup Programs Until Idle on Windows 7

The other day I was starting up my computer in a rush before class. As I waited for all the "necessary" startup programs to start up, it hit me. Wouldn't it be great to be able to a prioritize the way my computer starts up? More than that though, I want to be able to tell some programs to not launch until my computer isn't being used. They can load up after I leave for class. If I need them I can just launch them manually.

A few Google searches yielded a few programs (some free some not), but I am always hesitant to hand over important things like startup procedures to an unknown program from the abyss. Then I found my answer.

Enter Window Task Scheduler. I had encountered Windows Task Scheduler before on Windows 8 but hadn't ever directly used it on Windows 7. It does exactly what I wanted! Using the task scheduler it is pretty trivial to create a task to start a program after startup and whenever the computer is idle. However, I thought I could make it easier.

I decided to create a batch file to launch my secondary programs (KeePass, iTunes updater, etc.). Then all I have to do is create one scheduled event in the task scheduler to launch the batch file. Even better, I can put the batch file somewhere convenient (the desktop, documents, etc), so it is easy to change. If you're reading this, I will assume you know how to find the startup programs you have on your computer. Make sure you don't get delay an important one.

Anyway, here is the batch file code. The best way to see what is going on is to just open a command window and type HELP START. This will give you all the commands you need. Note that if you are using a location that has spaces you will need to put it in quotes with a /D preceding it.

@ECHO OFF

START /B /D C:\Users\Matthew\AppData\Local\Google\Update\GoogleUpdate.exe
START "Startup Batch Window"  /B  /D "C:\ProgramFiles(x86)\Seagate\SeagateDashboard2.0\DBAgent.exe"
START "Startup Batch Window"  /B  /D  "C:\ProgramFiles(x86)\KeePassPasswordSafe2\KeePass.exe" 


And here are some screenshots of me making my scheduled event.
Create New Task


Adding a Trigger

Triggers for My Event

Adding Action to be Triggered - Launch Batch File


Hopefully this is useful to someone. As my Calculus II professor always said, "What is that American expression? There is more than one way to skin the cat?" If I missed a much easier, more effecient, or more logical one feel free to comment. This just seems to work for me.

-Matthew

Tuesday, August 27, 2013

Introduction to myrobotlab (MRL)

First, let me say that I am a user of myrobotlab. Not a developer. With that in mind, it is also safe to say that I really know very little about the software. This post is just a collection of things I have learned and observations I have made from a user's perspective.

For a while I have been wanting to do a little vision processing, and being a FIRST robotics alumni I had seen a bit of this done. While I had never been actively a part of the programming, I also knew that FIRST teams get a "free" copy of roborealm with their kit every year, and that is what many teams use for vision processing. Well that is all well and good, but I like free. I began looking for a free version of roborealm and found myrobotlab.

Well for those that may be coming from the land of Arduino (like me) MRL is completely foreign. At first glance, it looks all GUI and friendly, then you discover a hidden underworld of features that can only be found by someone who already knows where they are. Regardless, after getting it installed, getting OpenCV (a widely used computer vision library. See HERE) up and running is pretty simple. You can have your camera finding your face in a matter of seconds. Now, doing something with that data is more tricky.

Now like I said, I am in no way a trusted source on this, but this is my take on how MRL works. You have a set of services running within a Java infrastructure. These services can do just about anything. At the time of this writing the main way you link these services together is by a Python service. From there you can set up the links from service outputs to service inputs. There's just one problem. How do you know what each service can input and output?

Well that is where not being a real programmer is a real pain. Basically, play around with stuff. Look at the examples on each service page and HERE. If you encounter a problem, post on the forum or in the chat and ask a developer. With features progressing so quickly, sometimes examples get left behind. One useful forum topic on this is found HERE. In it GroG discusses several ways to look at the various methods for communicating with each service.

That's about all I can say about it. I have been playing around with it, and as someone who learned to "program" on an Arduino less than a year ago I can say that the fog does lift. Play with some examples and ask questions, and you will figure it out. Of course, if you already know Java or are a real programmer, I'm sure you will have no problems with it.

I have been playing around with the serial, keyboard, and opencv services mostly. Hopefully I will be able to post some cool projects with them in the very near future. Until then, check out myrobotlab. Such opensource projects are always neat to check out even if you aren't going to use them. The people on there are always nice, and I'm sure there's room for one more user.

-Matthew

Friday, June 7, 2013

Arduino Bluetooth with a HC-06 and JY-MCU

With the arrival of my Bluetooth module I decided to give wireless communication another try. I'm glad I did. Setting up my Bluetooth module for wireless communication took less than an hour. While I have not explored it very in depth yet, I can see myself getting some use from this module. It becomes a generic wireless COM port. I have even read about uploading sketches via Bluetooth if you use a custom bootloader. I will probably never delve into that, but let's get started with the basics.

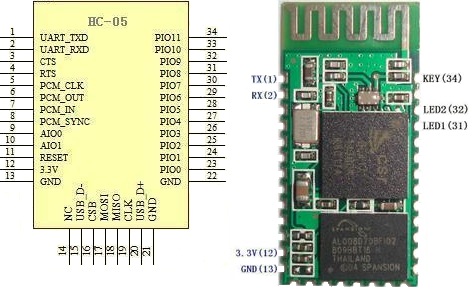
When I first ordered my Bluetooth module, I got a "Bluetooth Serial Transceiver Module Base Board with Enable function For Arduino" from Ebay. I payed a few dollars for it only to realize when I got it that the board was merely a breakout (called a JY-MCU) for another board. Another purchase later, and I had all the things I needed to get going. I got an HC-06 (aka "New Mini 3.3V wireless Bluetooth Transceiver Slave Module Serial Port 30ft TTL"). There is also an HC-05 which apparently is very similar (it seems to share the same pinout).


HC-05 pinout
First things first, I soldered my HC-05 onto the JY-MCU. These can be purchased already soldered for less than $10, but the soldering was good practice. I held the module in place with double sided tape and a piece of tape around the end while I soldered it. The contacts aren't too small, but you will need a decent soldering iron with a small tip.
My impressive soldering


Next I wired it up. This is the point where I began calling on the collective knowledge of the internet. Follow THIS Instructable. With a few changes, it is what I did. For the voltage divider I used a 2.2k Ohm and a 1k Ohm + 100 Ohm resistor. It worked fine. I checked it with the volt meter and it came out to about 3.1v. HERE is the voltage divider calculator I used. Be sure you use that on the Bluetooth Rx/ Arduino Tx side or else you could fry your Bluetooth module. The ATmega 2560 will accept 3.3v so the Arduino Rx is fine by itself (sort of. I wouldn't put this on anything too important, but worst you will get false data). Someday I'll get a real logic level converter. For convenience, I used the Serial1 pins on my Arduino Mega 2560.

Now you need to load a test sketch onto your Arduino. I used the one on the Instructable (with Serial changed to Serial1). To do this you will probably need to unplug the Arduino Rx pin. Should we have loaded the program before wiring like the Instructable said? Probably. Oh well. Take this opportunity to double check all wiring and ring them out with a volt meter.

Now we need to connect the HC-06 Bluetooth module to the computer. I am running Windows 7, and this took about 3 minutes. The steps are on the Instructable, but I would feel bad if I didn't post all the screenshots that I took. Power up your Bluetooth module and follow the steps below.

1) Find the Bluetooth Icon in the bottom right hand portion of the screen. Right Click and Select "Add a Device." My device was called linvor. Whatever floats their Chinese boat. The password for mine was 1234. If that doesn't work, try 0000.


2) Go to Devices and Printers and see if it appears. Wait for Windows to install all necessary drivers. note what COM port it is using. Mine uses two apparently.. Oh well. Not worth the energy to worry about it.


3) Download a terminal emulator program. "Can't I just use the Serial Monitor???" No. Only one device can use a serial port at a time. That is why the Serial Monitor shuts down when you upload a sketch. "Then what should I use???" Well I used Tera Term like the Instructable said because it was the least confusing to a simple mind like me. PuTTy and RealTerm are probably more popular choices. I haven't explored them. I'll assume you use Tera Term.

4) Connect to the module in Tera Term. This is super simple. Select the right COM port.


5) Bask in the beauty of the numbers streaming by. 


This took all of an hour for me. I was astonished at how painless it was, especially compared to my struggles with the nRF24L01+. I am not sure what I will do with it now (I have some ideas). I hope you all have the same success I did. If you need the sample sketches for some reason, they are HERE.

Best of luck,
-Matthew


Monday, May 20, 2013

Virus Removal: Part 2

Well this is part two, which is unfortunate. As I feared might be the case, we did not get all of the viruses on my relative's computer (see part 1). The next morning after I turned controls back over to my relative, we got a call. Something called Amazon Cloud Drive came up.

Well I can handle this, get in the car and drive over. Turns out Amazon Cloud Drive is not the problem, not even close. Some "mysterious" entity had broken the internet and the sound drivers. More snooping, the Windows Security Service that handles firewalls and such things (I gathered that is what it did) would not launch. Things were going haywire. Well fantastic.

Not having time to deal with it just then I kicked off a virus scan and left. On the way home I made a quick call to my brother. Though it is not his field, he has more experience at virus hunting than I do. He was quite encouraging (NOT). Basically, he suggested the problem was what I had already suspected but had not wanted to concede. He decided it was likely that she had a rootkit.

Well that is bad news. Malwarebytes had "removed" rootkit.0Access the day before, but at this point I felt pretty stupid for believing I had beaten it. His suggestion, reformat the drive with an external program and rebuild the computer from the ground up. "Scorched earth." Right. Well I had not conceded that fully yet.

1. Run Malwarebytes Anti-rootkit BETA. I don't work for them. I promise. I just happened to have seen this feature in the previous days and tried it ( from safe mode). It found a rootkit. I "removed" it. Yeah. Right.

2. Run Bitdefender Rescue CD. Well the Trend Micro rescue disk didn't find it last time, but we'll try it. It booted from Linux and scanned the drive. Interestingly, the internet works when booting from Linux. Yep. Virus.

3. Restore System. After much deliberation it was decided that we should restore the system. This basically resets the computer to an image on a hidden partition of the hard drive. Even if we got the virus, the internet and sound drivers as well as who knows what else were hosed. Yes we probably could fix it, but all she does is use it for email and news. We'll just restore it.

We tried to do this through Windows. No dice. Next, reboot and hit alt-f10 to do it outside of Windows. This took several tries for some reason, but eventually we had success. We did the one that saved her documents. For those that are wondering how long this will take (like we were), it took over an hour.

4. Reboot and reassess  Everything that looks good. Reinstall all the antivirus software. Scan the Backup folder where all her old documents were stored. It found something. Delete that and scan again. Then full system scan.

Now we put the computer back together again and hope for the best. Here's to hoping there is no part 3.

-Matthew

Friday, May 17, 2013

FBI Virus Removal


This is a little off topic, but I thought it might be useful nonetheless.

I recently had the pleasure of playing computer doctor for an older relative of mine. Somehow her computer (Windows 7- 64 bit) had acquired a lovely case of the FBI virus. On start-up, the computer was immediately hijacked and a page was loaded in place of Windows Explorer. It told the user that the FBI had taken over the computer that you are responsible for paying a fine of varying amounts for breaking various laws. It even took over the computer's webcam and took a picture. Fun stuff.

Google "FBI Virus" and you will get all sorts of information of the various strains. I don't know what the official name of the strain on this computer was, but these are the steps I went through to eliminate it. Note that the first few did not work (at least for me).

1. Boot in safe mode. This did not work. While the FBI ransom screen did not come up, as soon as Windows Explorer was launched, the computer would restart.

2. Boot in safe mode with command prompt. This did work. From here you can launch windows explorer by typing "explorer" (or I suppose any other program if you know the correct prompts). From this I was able to load Malwarebytes, but it needed to download definitions. Well safe mode with networking does not work. This means I would have to use the 40 day old definitions (see step 7). No good I decided. It's also worth noting that the anti-virus on the computer would not load at all, even in safe mode.

3. Trend Micro Rescue Disk (via USB)- This computer had Trend Micro Titanium on it when it was infected, so I decided to try the Rescue Disk. This boots the computer off of the flash drive (on Linux I think) and scans it from there. 3 hours later, no threats found. Next method.

4. msconfig. I should have tried this first, but didn't think of it. Booting in safe mode with command prompt I was able to launch msconfig (type msconfig in the command line). I then shut off all startup programs. I don't know if this is any different than booting in safe mode or not. I suspect not because it did not work.

5. HitmanPro. I ran loaded HitmanPro and tried scanning with that. It found some cookies and skype.dat. Well a google later and skype.dat was quarantined. Apparently that might be a virus as well. If I kill her skype I can fix that later (it didn't kill skype). I will also say that I had never heard of HitmanPro before. I just read that someone had had success with it and tried it. I had used Malwarebytes in the past.

6. Remove Adobe Flash. I read that the virus might depend on Flash to run, so I uninstalled every Adobe Product I could get my mouse on.

Beginnings of Results
7. Update Malwarebytes definitions manually. You can download newer definitions from HERE. I say newer because it said they were 8 day old. I copied them over with a flash drive and installed them. Ran a quick scan (all with explorer launch from safe mode with command prompt). It found skype.dat and its registry file. Malwarebytes actually deleted it. Restart in safe mode with networking. It works now. Download latest Malewarebytes definitions and run full scan. I did not reboot the computer normally at this point because I feared that the computer had more than one virus on-board.  If one of them survived, it could have reloaded the other ones (such was the fear anyway).

The full scan removed three more vicious looking threats Malware.Packer.CV, Rootkit.0Access, and Rootkit.0Access. I rebooted into safe mode again.

8. Run Microsoft Security Scanner. Downloaded and scanned. It found nothing.

I restarted the computer normally and everything appears normal. Now run more scans to make sure everything is OK and re-install anti virus software. The program files folder for Trend Micro was vacant, so  I installed Microsoft Security Essentials because it was free and didn't require a licence key. Re-install all the "needed" Adobe products. Reset all startup programs. I also noted that some of the internet security settings on IE appeared to be changed. Unchange them. For good measure, install ccleaner and clean up cookies, registry, and any other junk. Turn on daily virus scans and Windows automatic updates. Cross fingers and hand keys back to relative.

Good luck!
-Matthew


List of references:

Other things to try:

  • Kaspersky Rescue Disk
  • System Restore Point
  • Manually boot OS from flash drive
  • Hire a teenager
  • Buy a new computer and send me the broken one as a gift